Showing posts with label backup. Show all posts

Monday, January 08, 2007

Rsync & SSH on a Windows 2003 server

In my previous post about using ssh & rsync for backups, I wrote about backing up from my Fedora UNIX virtual machine to my UNIX backup server.

That was a fairly simple case (other than the need for the enveloping ssh sessions) because both systems had the requisite tools installed & configured. However, in a windows environment, those tools aren't there out of the box and need to be installed & configured as well as getting the script setup to do the backup.

This post addresses the steps necessary to setup a Windows 2003 server as an rsync server for backups from Windows clients. I'll address the client side in a future article. While I set this up on a Windows 2003 server, the steps most likely apply equally to any Windows server OS. \

Since the OS does not come with the necessary tools, I turned to the cygwin distribution of UNIX utilities for Windows.

Server Setup

  1. Download cygwin's setup.exe, which you then use to download and install cygwin components. I installed the complete package. I'm sure that you could get by with a lesser install, but given the cheap cost of disk space, why bother.
  2. Initialize sshd on your server:
    cpcahil(mercury,505): ssh-host-config
    Generating /etc/ssh_host_key
    Generating /etc/ssh_host_rsa_key
    Generating /etc/ssh_host_dsa_key
    Generating /etc/ssh_config file
    Privilege separation is set to yes by default since OpenSSH 3.3.
    However, this requires a non-privileged account called 'sshd'.
    For more info on privilege separation read /usr/share/doc/openssh/README.privsep.
    
    Should privilege separation be used? (yes/no) yes
    Warning: The following function requires administrator privileges!
    Should this script create a local user 'sshd' on this machine? (yes/no) yes
    Generating /etc/sshd_config file
    Added ssh to C:\WINDOWS\system32\drivers\etc\services
    Added ssh to /etc/inetd.conf
    
    Warning: The following functions require administrator privileges!
    
    Do you want to install sshd as service?
    (Say "no" if it's already installed as service) (yes/no) yes
    
    Which value should the environment variable CYGWIN have when
    sshd starts? It's recommended to set at least "ntsec" to be
    able to change user context without password.
    Default is "ntsec".  CYGWIN=ntsec
    
    The service has been installed under LocalSystem account.
    To start the service, call `net start sshd' or `cygrunsrv -S sshd'.
    
    Host configuration finished. Have fun!
    
  3. Configure sshd as appropriate

    For my server, I edited /etc/sshd_config to make the following changes:

    *** sshd_config.old     Sun Jan 16 07:31:24 2005
    --- sshd_config Sun Jan 16 16:38:38 2005
    ***************
    *** 28,34 ****
      # Logging
      #obsoletes QuietMode and FascistLogging
      #SyslogFacility AUTH
    ! #LogLevel INFO
    
      # Authentication:
    
    --- 28,34 ----
      # Logging
      #obsoletes QuietMode and FascistLogging
      #SyslogFacility AUTH
    ! LogLevel INFO
    
      # Authentication:
    
    ***************
    *** 39,45 ****
    
      #RSAAuthentication yes
      #PubkeyAuthentication yes
    ! #AuthorizedKeysFile   .ssh/authorized_keys
    
      # For this to work you will also need host keys in /etc/ssh_known_hosts
      #RhostsRSAAuthentication no
    --- 39,45 ----
    
      #RSAAuthentication yes
      #PubkeyAuthentication yes
    ! AuthorizedKeysFile    /etc/authorized_keys
    
      # For this to work you will also need host keys in /etc/ssh_known_hosts
      #RhostsRSAAuthentication no
    

    The key change there being the specification of the /etc/authorized_keys file as I use private keys to authenticate my clients to the server.

    This isn't necessary if you want to use username/password authentication as the out-of-the-box sshd implementation will use the windows active directory for authentication.

  4. Open port 22 on your firewall

    If you are running a firewall on your server, you need to open up incoming connections to port 22 (the port used by sshd) so that your clients can communicate with the sshd daemon (service) on your server.

  5. Start the "CYGWIN sshd" service. This can be done using the Windows Control Panel->Administrator's Tools->Services or via the following command:
    net start sshd
    
  6. Test sshd availability

    Run the command: telnet localhost 22

    The output should look like:

    bash-3.1$ telnet localhost 22
    Trying 127.0.0.1...
    Connected to myhost.mydomain.com.
    Escape character is  '^]'.
    SSH-1.9-OpenSSH_4.3
    

    the key being the last line. Once you see that, sshd is fine and you can abort the telnet (<ctrl>-] followed by quit).

  7. Configure Rsyncd for your system

    The rsyncd server was installed with the rest of CYGWIN in the first step above, so all we need to do is configure it as necessary. First part of the configuration is the /etc/rsyncd.conf file (if you installed CYGWIN into c:\cygwin, then the windows path for the file is c:\cygwin\etc\rsyncd.conf). If the file doesn't exist already create it. A portion of my rsyncd.conf:

    use chroot = false
    strict modes = false
    hosts allow = *
    uid = administrator
    secrets file = /etc/rsync.secrets.txt
    
    [angie]
            path = e:/data/angie
            read only = no
            auth users = angie
    

    The important lines in this file:

    • strict modes = false

      This disables strict access mode checking on the rsync.secrets.txt file (which rsyncd normally requires to have no access to anyone other than the owner).
    • secrets file = /etc/rsync.secrets.txt

      This tells rsync where the secrets file is located. The secrets file contains a list of id:password combinations. My secrets file looks like:

      angie:herpasswd
      conor:hispasswd
      
      This defines a secret for my wife (Angie) and I.
    • [angie]
              path = e:/data/angie
              read only = no
              auth users = angie
      

      This defines an rsync "module" (which you could look at as the equivalent of a rsync shared drive entry point). In this case the the module "angie" equates to the windows path "e:/data/angie", is not read-only and is only available to an rsync client that can present angie's secret.

  8. Install rsyncd as a service

    Run the command (in a cygwin bash shell window):

    cygrunsrv.exe -I "Rsync" -p /cygdrive/c/cygwin/bin/rsync.exe -a "--daemon --no-detach" -f "Rsync daemon service" -u Administrator -w admin_passwd
    

    That is all on one line (in case it wrapped in your browser).

  9. Start the rsync service (yeah, it's the rsyncd daemon (by UNIX naming conventions), but called the rsync service in Windows). This can be done using the Windows Control Panel->Administrator's Tools->Services or via the following command:
    net start rsync
    
  10. I did not have to open a firewall port for rsyncd since I would only be accessing rsyncd via an ssh tunnel (so the connection to rsyncd is a local connection from the sshd process).
  11. Test rsyncd availability

    Run the command: telnet localhost port
    Where port is the port chosen for rsyncd to listen on (the default 873).

    The output should look like:

    bash-3.1$ telnet localhost 873
    Trying 127.0.0.1...
    Connected to myhost.mydomain.com.
    Escape character is  '^]'.
    @RSYNCD: 29
    

    the key being the last line. Once you see that, rsyncd is fine and you can abort the telnet (<ctrl>-] followed by quit).

Issues

The system works very well for backups. One problem that we have experienced is that permissions set on files and folders created on the server are messed up. They are owned by the user id that rsyncd is being run as (in my case, administrator) and read, write and execute permissions are turned off. This means that when I add new photos to our photo collection on our server, my wife can't view them until I get onto the server and reset the permissions.

I have tried a few things to fix this to no avail. Others on the net have claimed that setting the CYGWIN environment variable to "nontsec" (as opposed to the default of "ntsec"). I tried that and it had an extremely negative impact on performance (the backup of my photo directory -- with no changes -- takes about 40 seconds normally, but with "nontsec" I killed it after 40 minutes with no perceived progress.

So, for now I live with the permissions problem.

Tags : / / / / / /

Tuesday, November 21, 2006

Backing up using SSH & Rsync

I run Fedora Linux inside of a VMWare Virtual Machine on my laptop and use it for web services development (see my Liberty open source toolkit) as well as a docbook document development system for working on the Liberty Alliance specifications (I edit the Discovery Service Specification and am working on their new Advanced Client Technologies spec).

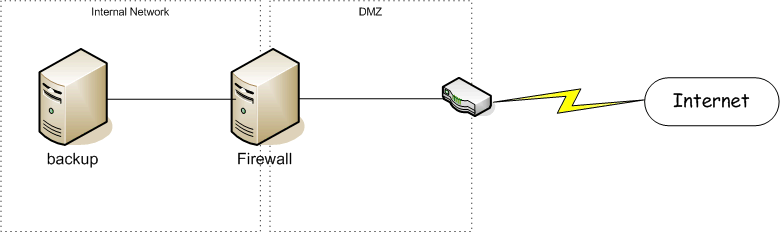
I needed a regular way to back this data up regardless of my location. At home I have a Linux server that I use for this purpose. Of course, that server is behind a firewall, so getting to it while at home vs while remote can be interesting. The diagram below shows the general situation:

The tricky part being that my laptop may appear on the internal network and may appear out on the internet and I want the backup to magically work regardless of the location.

Rsync combined with SSH seemed an ideal solution to the problem. I had to configure things so that they would work in the following scenarios:

  • At home where the backup server is available via a local network connection. This is the most efficient since I'm on a local connection and the VPN status doesn't matter since the connection is to a local IP address which is excluded from the VPN traffic.
  • On the road with the corporate VPN running. In this case I have to go through one of the corporate SOCKS servers.
  • On the road without the VPN. In this case I just go directly through my firewall (so similar to the local connection but instead of a local IP address, I use the network visible IP address).

In order to handle these scenarios, I've developed a layered model that takes several steps:

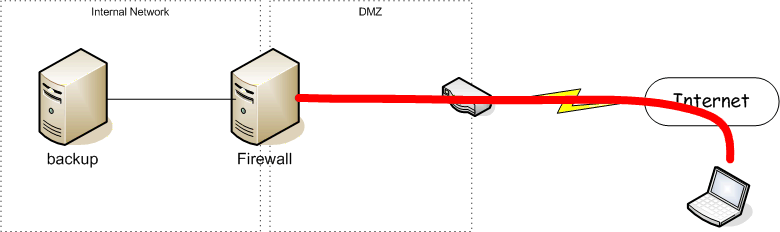
  • Step 1: Create an SSH tunnel from my laptop to my internal firewall:

    This would go through our corporate SOCKS proxy if I'm at the office or on the VPN.
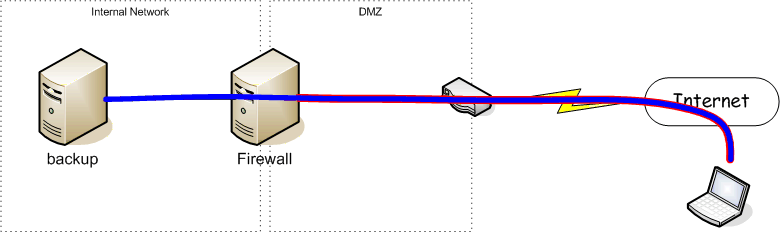
  • Step 2: Create an SSH Tunnel through the tunnel created in Step 1 to my backup server

  • Step 3: Run Rsync across the SSH tunnel created in Step 2.

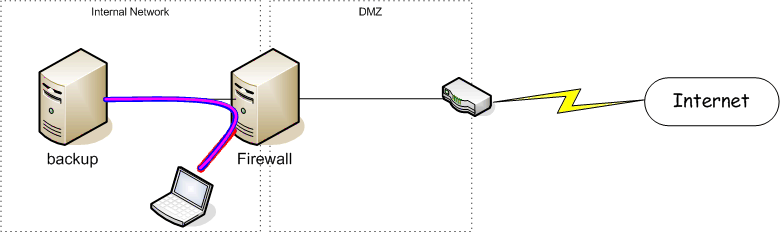
When I'm home, I use the same layered model (probably because I'm too lazy to add the code to skip one of the layers) which looks like:

So, let's examine the code that I use to accomplish this....

  1. Determine connectivity status (home, away with VPN, away). I accomplish that cheaply (and somewhat riskly by simply using ping):
    if [ "x$1" == "x-local" -o "x$1" == "xlocal" ]; then
        CONNECT=local
    elif [ "x$1" == "x-remote" -o "x$1" == "xremote" ]; then
        CONNECT=remote
    elif [ "x$1" == "x-proxy" -o "x$1" == "xproxy" ]; then
        CONNECT=proxy
    elif ping -q -c 1 ${GatewayIP} > /dev/null 2>&1; then
        CONNECT=local
    elif ping -q -c 1 ${HomePingName} > /dev/null 2>&1; then
        CONNECT=remote
    else
        CONNECT=proxy
    fi
    

    The first 3 options allow the location to be manually forced (useful in some situations where it looks like I have connectivity that I don't).

    The next option checks to see if I can ping the local address (${GatewayIP}) on the firewall (which would mean I am home or there just happens to be another system with the same IP address in my local network -- possible, but I haven't run into that problem often).

    The next option attempts to ping the external address on the gateway (which would mean that I'm away from home, but without the corporate VPN).

    And, of course, if none of them work, the assumption is that I'm behind the corporate firewall and have to use the corporate SOCKS proxy.

  2. Setup connection parameters appropriately:
    case "${CONNECT}" in
        local)
            GATEWAY="${GatewayIP}"
            GWCFG=
            echo "NOTE: Connecting locally"
            ;;
        remote)
            GATEWAY="${GatewayExternalIP}"
            GWCFG=""
            echo "NOTE: Connecting Direct to external gateway"
            ;;
        *)
            GATEWAY="${GatewayName}"
            GWCFG="-F $HOME/.ssh/ProxyConfig"
            echo "NOTE: Connecting remotely through Proxy"
            ;;
    esac
    

    This sets up the Name or IP address of the initial SSH connection gateway (GATEWAY) and sets up whether or not I need to go through a proxy (GWCFG). The ProxyConfig file has the following contents:

    Host *
        ProxyCommand connect -S proxyhost %h %p
    

    Where proxyhost is the name of the proxy server and connect is a SOCKS4/5 compliant proxy client wrapper written by Shun-ichi Goto and available from his web site

  3. Establish the first SSH tunnel (to the firewall):
    echo "Setting up SSH connections..."
    echo "  ** base connection to home gateway..."
    ssh ${GWCFG} -2 -n -N -T -L 2222:${DESTIP}:22          -l username ${GATEWAY} < /dev/null &
    SUB_PID1=$!
    echo -n "     * waiting for ssh listener to start..."
    sleep 2
    until `netstat -a -n | grep -q 2222`; do
        echo -n "."
        sleep 2
    done
    echo "done"
    

    This SSH command uses the proxy (if necessary) to connect to the internal firewall (${GATEWAY}) with the following options:

    • -2 - use SSH protocol version 2.
    • -n - don't ready anything from (needed if running SSH in background).
    • -N - don't execute a remote command. Normally SSH would startup a login shell on the remote system. In this case, we're just creating a tunnel so no need for a remote command.
    • -T - disable pseudo-ttys (again, we just want a tunnel so don't need ttys either.
    • -L 2222:${DESTIP}:22 - setup a port forward of local port 2222 to port 22 on ${DESTIP} (from the remote system). This means that any connections to port 2222 on the local system will be forwarded to connections to port 22 on ${DESTIP}. ${DESTIP} is the ip address of the backup server.
    • -l username - use username as the login on the gateway system.
    • ${GATEWAY} - the system that this SSH connects to.

    Since the SSH is started in the background, I have a small loop running waiting until a listerner starts up on port 2222 before we can proceed with the next step.

  4. Establish the 2nd SSH tunnel (through the firewall to the backup server):
    echo "  ** layered connection to backup server..."
    ssh -2 -n -C -N -T -p 2222 -L 1873:127.0.0.1:873             -l ${DESTUSER} ${DESTHOST} < /dev/null &
    SUB_PID2=$!
    echo -n "     * waiting for rsync listener to start..."
    sleep 2
    until `netstat -a -n | grep -q 1873`; do
        echo -n "."
        sleep 2
    done
    echo "done"
    

    This ssh command uses the tunnel established in the previous step to connect to the backup server (${DESTHOST}) with the following options:

    • -2 - use SSH protocol version 2.
    • -n - don't ready anything from (needed if running SSH in background).
    • -C - compress data on this connection. I didn't compress data on the outer SSH since you don't want to compress twice and this layer would see the original data while the outer layer would see encrypted (and likely less compressable) data.
    • -N - don't execute a remote command. Normally ssh would startup a login shell on the remote system. In this case, we're just creating a tunnel so no need for a remote command.
    • -T - disable pseudo-ttys (again, we just want a tunnel so don't need ttys either.
    • -p 2222 - connect to port 2222 (the port we have the listener configured for from the outer ssh layer).
    • -L 1873:127.0.0.1:873 - setup a port forward of local port 1873 to port 873 (the rsyncd port) on localhost(the remote system). This means that any connections to port 1873 on the local system will be forwarded to port 873 on the remote system.
    • -l ${DESTUSER} - use ${DESTUSER} as the login on the backup system.
    • ${DESTHOST} - this would normally be localhost since the listener from the outer layer ssh is listening on the local system. However, ssh really gets upset when you have remote entities that look like the same entity but have different private keys, so the host here will be an alias for localhost defined in the /etc/hosts file. So my local /etc/hosts file has a line that looks like:
      127.0.0.1   mysystem localhost backupsys 
      
      And ${DESTHOST} has the value "backupsys".

    Since the SSH is started in the background, I have a small loop running waiting until a listerner starts up on port 1873 before we can proceed with the next step.

  5. Run the backup using rsync:
    cd ${SRCDIR}
    echo "Backing up ${SRCDIR}..."
    RSYNC_PASSWORD=mypass rsync --port=1873 --relative --recursive          --verbose --times --delete-after --archive --exclude */Cache/ . user@backupsys::data/home
    echo "Backup done!"
    

    This rsync command uses the tunnel established in the previous step to communicate securely with the rsyncd daemon running on the backup server. The options specified include:

    • --port=1873 - connect to the rsyncd running at port 1873 (which, because of the tunnel we setup in the previous step actually talks to the rsyncd running on port 873 on the backup server).
    • --relative - use relative pathnames (IMHO should almost always be used).
    • --recursive - include sub-directories recursively (so the entire directory tree)
    • --verbose - document what's going on (generates log records of files that were backed up and/or deleted
    • --times - keep the file access/modification times on the files on the remote system the same as those on the local system.
    • --delete-after - delete files that are not present on the local system after the backup is done (as opposed to first).
    • --archive - use archive mode (shortcut for specifying a series of other flags)
    • --exclude */Cache/ - exclude any cache files from the backup
    • . - backup starting in the current directory
    • user@backupsys::data/home - backup to the system backupsys using the user name "user" and into the data/home directory on the backup server. The rsync password for "user" is specified in the environment variable "RSYNC_PASSWORD" so that it isn't easily visible on the process list.
  6. Finally, now that the backup is complete, tear down the SSH tunnels that were started in the background:
    echo "Tearing down SSH connections..."
    kill ${SUB_PID2}
    kill ${SUB_PID1}
    sleep 2
    echo "DONE!!!"
    

    The PIDs for the ssh sessions were saved during the creation of the tunnels.

This system has worked for me for several years and does quite a good job of allowing me to backup my data where ever I am (and since I travel an awful lot, being able to do so on the road is extremely useful).

Tags : / / / / / / / / /

Saturday, November 04, 2006

Backing up your digital life

As we all build our collections of digital content, from digital photos to multi-GB ripped music collections, we are placing a substantial burden on that little piece of hardware in our computer (the hard drive) that is one of the more likely components to fail. This failure, especially in the case of digital photos where you usually have but one copy of them on one drive, can lead to a substantial, irrecoverable loss of priceless moments of our lives.

What surprises me is that the subject of backing the data up is not heavily discussed in the documentation that comes along with those wonderful digital cameras, or those fancy MP3 players). Before you suffer from one of these losses, I strongly suggest that you take a few easy steps to protect your data.

When considering backup solutions you need to think in terms of normal day-to-day backup and recovery (such as getting back a file or directory that you accidentally deleted) and about disaster recovery (such as when your house burns down or when a power surge takes out all of your electronics -- both of these have happened to families I personally know in the past couple of years).

The backup options available today make this process much easier than it has been in the past and at a very low cost. These include:

  • External drive backup. Today you can buy external drives with automated and/or pushbutton backup which will backup your data directly to the external drive. Solutions include the Seagate Pusbutton Backup, Western Digital My Book and many others. This solution protects you from system failure, virus attack (as long as the virus doesn't also attack the external drive) but does not generally provide a good disaster recovery solution given that whatever damaged your computer will likely have damaged the external drive as well.
  • Online backup. There are many online solutions providing remote backup where the costs are extremely reasonable if not downright cheap. These include the likes of Xdrive (5GB for free, no clear option on more) AT&T Online Vault (2GB for $5.95/mo + $2/GB additional (to max of $17.95/mo)), Media Max (25GB for free, 100GB for $4.95/mo, 1TB for $29.95/mo). These are very cost effective, easy to use and once you get the initial data upload over, very efficient and automated. This is an excellent disaster recovery and a pretty good day-in/day-out recovery solution, but can be slow if you need to restore a substantial number of files.
  • Tape backup. For the most part, this isn't a necessary solution except for the enterprise (office) and even then, the diving cost of hard drive storage is making tape a think of the past.
  • Server Backup. Only for the geeks out there, but it is what I do. Backup of your data to a personal server. I've set my own server up such that I can backup my laptop from any location (home, office, on the road) but this solution isn't for the weary. In a future article, I'll explain my configuration and the software I use to support this model.

My recommendation is to use a combination of backup models. First a local backup to an external drive with disaster protection provided by one of the low cost online backup solutions.

My personal solution to date has been a local backup to a raid-5 drive that is mirrored to another drive (providing a very high reliability local storage) and I have the entire data set periodically backed up to an external drive that I keep in my office in Oregon (my disaster recovery solution). The research for this article has led me to decide to change over to using an online backup system for my disaster recovery solution.

Tags : / / / / / / / / / / /