I run Fedora Linux inside of a VMWare Virtual Machine on my laptop and use it for web services development (see my Liberty open source toolkit) as well as a docbook document development system for working on the Liberty Alliance specifications (I edit the Discovery Service Specification and am working on their new Advanced Client Technologies spec).
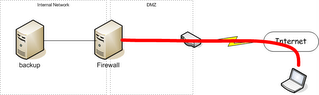
I needed a regular way to back this data up regardless of my location. At home I have a Linux server that I use for this purpose. Of course, that server is behind a firewall, so getting to it while at home vs while remote can be interesting. The diagram below shows the general situation:
The tricky part being that my laptop may appear on the internal network and may appear out on the internet and I want the backup to magically work regardless of the location.
Rsync combined with SSH seemed an ideal solution to the problem. I had to configure things so that they would work in the following scenarios:
- At home where the backup server is available via a local network connection. This is the most efficient since I'm on a local connection and the VPN status doesn't matter since the connection is to a local IP address which is excluded from the VPN traffic.
- On the road with the corporate VPN running. In this case I have to go through one of the corporate SOCKS servers.
- On the road without the VPN. In this case I just go directly through my firewall (so similar to the local connection but instead of a local IP address, I use the network visible IP address).
In order to handle these scenarios, I've developed a layered model that takes several steps:
- Step 1: Create an SSH tunnel from my laptop to my internal firewall:
 This would go through our corporate SOCKS proxy if I'm at the office or on the VPN.
 - Step 2: Create an SSH Tunnel through the tunnel created in Step 1 to my backup server

- Step 3: Run Rsync across the SSH tunnel created in Step 2.


When I'm home, I use the same layered model (probably because I'm too lazy to add the code to skip one of the layers) which looks like:
So, let's examine the code that I use to accomplish this....
- Determine connectivity status (home, away with VPN, away). I accomplish that cheaply (and somewhat riskly by simply using ping):
if [ "x$1" == "x-local" -o "x$1" == "xlocal" ]; then
    CONNECT=local
elif [ "x$1" == "x-remote" -o "x$1" == "xremote" ]; then
    CONNECT=remote
elif [ "x$1" == "x-proxy" -o "x$1" == "xproxy" ]; then
    CONNECT=proxy
elif ping -q -c 1 ${GatewayIP} > /dev/null 2>&1; then
    CONNECT=local
elif ping -q -c 1 ${HomePingName} > /dev/null 2>&1; then
    CONNECT=remote
else
    CONNECT=proxy
fi
The first 3 options allow the location to be manually forced (useful in some situations where it looks like I have connectivity that I don't).
The next option checks to see if I can ping the local address (${GatewayIP}) on the firewall (which would mean I am home or there just happens to be another system with the same IP address in my local network -- possible, but I haven't run into that problem often).
The next option attempts to ping the external address on the gateway (which would mean that I'm away from home, but without the corporate VPN).
And, of course, if none of them work, the assumption is that I'm behind the corporate firewall and have to use the corporate SOCKS proxy.
- Setup connection parameters appropriately:
case "${CONNECT}" in
    local)
        GATEWAY="${GatewayIP}"
        GWCFG=
        echo "NOTE: Connecting locally"
        ;;
    remote)
        GATEWAY="${GatewayExternalIP}"
        GWCFG=""
        echo "NOTE: Connecting Direct to external gateway"
        ;;
    *)
        GATEWAY="${GatewayName}"
        GWCFG="-F $HOME/.ssh/ProxyConfig"
        echo "NOTE: Connecting remotely through Proxy"
        ;;
esac
This sets up the Name or IP address of the initial SSH connection gateway (GATEWAY) and sets up whether or not I need to go through a proxy (GWCFG). The ProxyConfig file has the following contents:
Host *
    ProxyCommand connect -S proxyhost %h %p
Where proxyhost is the name of the proxy server and connect is a SOCKS4/5 compliant proxy client wrapper written by Shun-ichi Goto and available from his web site
- Establish the first SSH tunnel (to the firewall):
echo "Setting up SSH connections..."
echo "  ** base connection to home gateway..."
ssh ${GWCFG} -2 -n -N -T -L 2222:${DESTIP}:22          -l username ${GATEWAY} < /dev/null &
SUB_PID1=$!
echo -n "     * waiting for ssh listener to start..."
sleep 2
until `netstat -a -n | grep -q 2222`; do
    echo -n "."
    sleep 2
done
echo "done"
This SSH command uses the proxy (if necessary) to connect to the internal firewall (${GATEWAY}) with the following options:
- -2 - use SSH protocol version 2.
- -n - don't ready anything from
(needed if running SSH in background). - -N - don't execute a remote command. Normally SSH would startup a login shell on the remote system. In this case, we're just creating a tunnel so no need for a remote command.
- -T - disable pseudo-ttys (again, we just want a tunnel so don't need ttys either.
- -L 2222:${DESTIP}:22 - setup a port forward of local port 2222 to port 22 on ${DESTIP} (from the remote system). This means that any connections to port 2222 on the local system will be forwarded to connections to port 22 on ${DESTIP}. ${DESTIP} is the ip address of the backup server.
- -l username - use username as the login on the gateway system.
- ${GATEWAY} - the system that this SSH connects to.
Since the SSH is started in the background, I have a small loop running waiting until a listerner starts up on port 2222 before we can proceed with the next step.
- Establish the 2nd SSH tunnel (through the firewall to the backup server):
echo "  ** layered connection to backup server..."
ssh -2 -n -C -N -T -p 2222 -L 1873:127.0.0.1:873             -l ${DESTUSER} ${DESTHOST} < /dev/null &
SUB_PID2=$!
echo -n "     * waiting for rsync listener to start..."
sleep 2
until `netstat -a -n | grep -q 1873`; do
    echo -n "."
    sleep 2
done
echo "done"
This ssh command uses the tunnel established in the previous step to connect to the backup server (${DESTHOST}) with the following options:
- -2 - use SSH protocol version 2.
- -n - don't ready anything from
(needed if running SSH in background). - -C - compress data on this connection. I didn't compress data on the outer SSH since you don't want to compress twice and this layer would see the original data while the outer layer would see encrypted (and likely less compressable) data.
- -N - don't execute a remote command. Normally ssh would startup a login shell on the remote system. In this case, we're just creating a tunnel so no need for a remote command.
- -T - disable pseudo-ttys (again, we just want a tunnel so don't need ttys either.
- -p 2222 - connect to port 2222 (the port we have the listener configured for from the outer ssh layer).
- -L 1873:127.0.0.1:873 - setup a port forward of local port 1873 to port 873 (the rsyncd port) on localhost(the remote system). This means that any connections to port 1873 on the local system will be forwarded to port 873 on the remote system.
- -l ${DESTUSER} - use ${DESTUSER} as the login on the backup system.
- ${DESTHOST} - this would normally be localhost since the listener from the outer layer ssh is listening on the local system. However, ssh really gets upset when you have remote entities that look like the same entity but have different private keys, so the host here will be an alias for localhost defined in the /etc/hosts file. So my local /etc/hosts file has a line that looks like:
And ${DESTHOST} has the value "backupsys".127.0.0.1 mysystem localhost backupsys
Since the SSH is started in the background, I have a small loop running waiting until a listerner starts up on port 1873 before we can proceed with the next step.
- Run the backup using rsync:
cd ${SRCDIR}
echo "Backing up ${SRCDIR}..."
RSYNC_PASSWORD=mypass rsync --port=1873 --relative --recursive          --verbose --times --delete-after --archive --exclude */Cache/ . user@backupsys::data/home
echo "Backup done!"
This rsync command uses the tunnel established in the previous step to communicate securely with the rsyncd daemon running on the backup server. The options specified include:
- --port=1873 - connect to the rsyncd running at port 1873 (which, because of the tunnel we setup in the previous step actually talks to the rsyncd running on port 873 on the backup server).
- --relative - use relative pathnames (IMHO should almost always be used).
- --recursive - include sub-directories recursively (so the entire directory tree)
- --verbose - document what's going on (generates log records of files that were backed up and/or deleted
- --times - keep the file access/modification times on the files on the remote system the same as those on the local system.
- --delete-after - delete files that are not present on the local system after the backup is done (as opposed to first).
- --archive - use archive mode (shortcut for specifying a series of other flags)
- --exclude */Cache/ - exclude any cache files from the backup
- . - backup starting in the current directory
- user@backupsys::data/home - backup to the system backupsys using the user name "user" and into the data/home directory on the backup server. The rsync password for "user" is specified in the environment variable "RSYNC_PASSWORD" so that it isn't easily visible on the process list.
- Finally, now that the backup is complete, tear down the SSH tunnels that were started in the background:
echo "Tearing down SSH connections..."
kill ${SUB_PID2}
kill ${SUB_PID1}
sleep 2
echo "DONE!!!"
The PIDs for the ssh sessions were saved during the creation of the tunnels.
This system has worked for me for several years and does quite a good job of allowing me to backup my data where ever I am (and since I travel an awful lot, being able to do so on the road is extremely useful).
Tags : backup / ssh / rsync / fedora / vmware / liberty / socks / socks5 / vpn / linux


7 comments:
hey there, conor! great article, and I wanted to give you some credit when paraphrasing some of what you said, but there doesn't seem to be a "trackback" link on this page. If you later care to add one, you can tip me off.
Ref. article.
y.f.
carl-erik
lommetennis - at - hotmail.com
Alas, Blogger/Blogspot don't appear to support trackbacks, so the best you can do is just use the article URL to refer to the particular blog entry you're quoting/paraphrasing.
Thanks for your comments and your desire to credit.
Really nice job. Thanks for the help! I just needed a way to jump the gateway to rsync a site for deployment but your post helped out bigtime.
Very good explanation! thanks!
Do you now how can I do if I want to do the backup using a proxy server?
For example, using some of the proxy servers found in an online list with proxy IP.
Steven,
I don't know off the top of my head, but I assume you just need to get the ssh or rsync proxied through one of those proxies. Not too hard if they expose a SOCKs proxy as well.
Thanks Conor!
I'm going to try what you said.
One more question, do you know how can I do to know if a proxy IP:port exposes a SOCKs proxy or not?
Like, using telnet, what did I expect to get in the answer? then I can do a small script to check this automatically.
I've never manually connected with a SOCKS proxy and I don't know what the protocol is. However, you can get anonymous socks5 proxies by searching for them directly. I found the following:
http://atomintersoft.com/products/alive-proxy/socks5-list/
with a quick google search.
Post a Comment